
Our legal Page links are in the Footer
Module 4: High Heat Cooking - The Secret Behind Restaurant Style Curry
.jpg)
Welcome to Module 4 — Mastering High Heat Cooking
One of the biggest differences between home curry cooking and restaurant curry cooking is how heat is used.
Many home cooks naturally cook curries over a low or medium heat. It feels safer and more controlled, especially when working with spices, garlic, onions, and sauces that can easily catch or burn.
The problem is that gentle cooking does not always create the same flavours you experience from a restaurant or takeaway curry.
Professional curry chefs use heat as a cooking tool.
They are not simply cooking hotter — they are using controlled high heat to build layers of flavour quickly.
When used correctly, high heat helps create:
• Deep, developed flavour
• Rich aromas
• Fast caramelisation
• Better sauce texture
• More intense colour
• A slightly smoky restaurant-style finish
This is one of the reasons a curry cooked in a professional kitchen can taste different, even when the ingredients are almost identical.
The secret is not just the recipe.
It is the technique.
High heat cooking can seem intimidating at first. Many people worry about burning spices, sticking pans, or ruining a dish, but once you understand what is happening in the pan it becomes much easier to control.
A good curry chef knows when to increase the heat, when to reduce it, when to stir, and when to let ingredients fry and develop flavour.
Learning this skill will completely change the way you cook curry.
In this module, you will learn:
• Why high heat is so important in curry cooking
• When to use high heat — and when not to
• How restaurants cook quickly without burning ingredients
• The difference between frying, roasting, simmering, and reducing
• Why preparation and timing are essential
• How to control spices at high temperatures
• How to recognise when your curry is developing properly
• The most common heat mistakes and how to avoid them
By the end of this module, you will understand that great curry cooking is not about simply following instructions.
It is about learning what is happening inside the pan.
Once you master heat control, you move one step closer to cooking with the confidence of a restaurant curry chef.
"New to curry cooking? Start with the Curry Foundations Module to learn the essential techniques behind great curry.? Why not check out our previous free modules"
Lesson 1 — Why High Heat Matters
When people first start cooking curry at home, they usually focus on ingredients.
They search for the perfect spice mix, the correct amount of garlic and ginger, or the secret ingredient that creates restaurant flavour.
Ingredients are important, but they are only part of the story.
One of the biggest secrets behind a great curry is how those ingredients are cooked.
Heat changes ingredients.
It develops flavours, creates aromas, changes textures, and transforms simple ingredients into something much richer.
This is where high heat cooking becomes so important.
Cooking vs Developing Flavour
There is a big difference between simply cooking ingredients and building flavour.
For example, an onion gently cooked over low heat will soften.
It is cooked.
But an onion fried correctly with enough heat will begin to change.
The natural sugars start to develop, the colour becomes deeper, and the flavour becomes sweeter and richer.
The same ingredient can produce completely different results depending on how heat is applied.
This is one of the biggest differences between average curry cooking and restaurant-style curry cooking.
How Restaurants Use Heat
Restaurant curry kitchens are designed around speed and efficiency.
Chefs often work with powerful burners, hot pans, and ingredients that have already been prepared.
A curry can be cooked in minutes because the chef is using heat to quickly develop flavour at every stage.
High heat helps:
• Fry ingredients instead of steaming them
• Develop deeper flavours quickly
• Reduce sauces faster
• Create richer colours
• Improve the final texture of the curry
This fast cooking method is a major part of British Indian Restaurant (BIR) style cooking.
The Importance of Caramelisation
One of the biggest benefits of high heat cooking is caramelisation.
Caramelisation happens when natural sugars in ingredients are transformed by heat.
In curry cooking this can happen with ingredients like:
• Onions
• Garlic
• Ginger
• Tomatoes
• Peppers
As these ingredients cook, their flavour becomes deeper and more complex.
This creates some of the rich background flavours associated with restaurant curries.
Without enough heat, ingredients often soften but do not develop the same depth.
Creating Layers of Flavour
A great curry is built in stages.
Each stage adds another layer.
For example:
First the oil is heated.
Then garlic, ginger, and spices release their flavour.
Next the sauce reduces and concentrates.
Finally everything comes together into a finished curry.
Each step relies on controlling heat correctly.
If the heat is too low, flavours can taste flat.
If the heat is too high without control, ingredients can burn.
The skill is learning the balance.
High Heat Does Not Mean Maximum Heat
This is one of the biggest misunderstandings.
High heat cooking does not mean turning the hob up fully and leaving it there.
Professional chefs constantly adjust heat.
They watch.
They listen.
They smell.
They react.
The pan tells you what is happening.
A strong sizzle usually means ingredients are frying.
No sound often means the pan is too cool.
A burnt smell means things have gone too far.
Good cooking comes from learning these signs.
Why Beginners Often Avoid High Heat
Many home cooks avoid high heat because they worry about:
• Burning spices
• Food sticking
• Losing control
• Cooking too quickly
This is completely normal.
High heat cooking feels fast at first.
But with preparation and practice, it becomes one of the most enjoyable parts of curry cooking.
Instead of waiting for flavour to appear slowly, you start creating it.
Lesson Summary
In this lesson you learned:
• Heat is one of the biggest differences between home and restaurant curry cooking
• Cooking ingredients and developing flavour are not always the same thing
• High heat creates caramelisation and deeper flavour
• Restaurant chefs use heat as a tool
• High heat requires control, not simply maximum temperature
Mastering heat is one of the biggest steps towards creating authentic restaurant-style curries at home.
Mini quiz 1
Quick Check: Why High Heat Matters
Before moving on, take a moment to test your understanding of how heat affects curry cooking.
These quick questions will help reinforce why high heat is such an important part of building flavour, texture, and that restaurant-style finish.
Remember, high heat cooking is not about simply turning the temperature up — it is about learning how to control heat and understand what is happening in the pan.
Take your time, think it through, and don’t worry if you don’t get everything right first time.
Every great curry cook improves by learning, practising, and understanding the process.
Lesson 1 Knowledge Review (Why High Heat Matters)
🎉 Well done!
You’ve completed this lesson and taken your first step towards understanding one of the biggest differences between home cooking and restaurant-style curry cooking — how heat creates flavour.
If you passed — brilliant. You’re starting to understand that great curry cooking is not just about ingredients, it’s about technique.
If not, no problem at all — revisit the lesson and try again. Learning to control heat takes practice, and every great cook develops this skill over time.
Either way, you’re building confidence and learning to understand what is happening inside the pan.
🔥 The more you understand heat, the more control you have over flavour.
👉 Next up: we’ll look at one of the most important differences in curry cooking — frying vs steaming — and why two cooks using the same ingredients can produce completely different results.
Take your time, and when you’re ready — move on to the next lesson.
Lesson 2 — Frying vs Steaming: Understanding What Is Happening in the Pan
One of the most important skills in curry cooking is understanding the difference between frying ingredients and steaming ingredients.
Both methods use heat.
Both methods cook food.
But they create very different results.
Many home cooks follow a recipe perfectly, use the correct spices, and measure every ingredient carefully — but the finished curry still tastes different from a restaurant version.
Often, the difference is not the ingredients.
It is what happened in the pan.
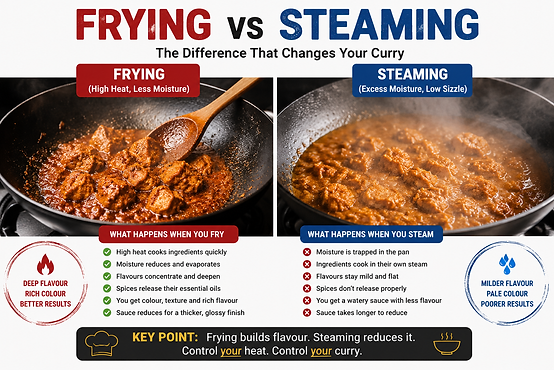
What Happens When Ingredients Fry?
Frying happens when ingredients cook in hot oil at a temperature where moisture evaporates quickly.
Instead of sitting in their own liquid, the ingredients make direct contact with the hot pan and oil.
This creates:
• Stronger aromas
• Deeper colour
• Better texture
• Richer flavour
This is why restaurant kitchens focus heavily on the frying stages of a curry.
They are not just heating ingredients.
They are developing them.
What Happens When Ingredients Steam?
Steaming happens when ingredients release moisture faster than it can evaporate.
Instead of frying against the hot surface of the pan, the food starts cooking in its own liquid.
The ingredients will still cook.
They will become soft.
But they usually develop less flavour.
Common signs that ingredients are steaming include:
• Lots of liquid collecting in the pan
• Weak or no sizzling sound
• Pale ingredients with little colour change
• Ingredients becoming soft but not developing flavour
This is one reason some homemade curries taste thinner or less intense.
Why Onions Are a Perfect Example
Onions show the difference between frying and steaming very clearly.
Cook onions slowly with too much moisture and they soften.
They become cooked onions.
Increase the heat, control the moisture, and allow them to fry properly, and something different happens.
They become:
• Sweeter
• Darker
• Richer
• More flavourful
The same ingredient creates a completely different result.
The difference is heat control.
Overcrowding the Pan
One of the biggest causes of steaming is adding too much food at once.
Every ingredient contains water.
When a large amount of cold ingredients enters the pan, two things happen:
-
The pan temperature drops quickly
-
Lots of moisture is released at the same time
The pan cannot recover fast enough.
Instead of frying, everything starts steaming.
This is especially common with:
• Chicken
• Mushrooms
• Peppers
• Onions
Sometimes cooking smaller amounts produces better results than filling the pan.
Why Restaurants Avoid This Problem
Restaurant kitchens are designed to maintain heat.
They often use:
• Powerful burners
• Thin pans that heat quickly
• Ingredients prepared in advance
• Smaller portions cooked quickly
This allows ingredients to fry properly without sitting in excess moisture.
It is one of the reasons restaurant curries can develop so much flavour in only a few minutes.
Listen to Your Pan
One of the best ways to improve your cooking is to listen.
A good frying stage has energy.
You should hear a steady sizzle.
That sound tells you moisture is evaporating and ingredients are frying.
If the pan becomes quiet, there is a good chance the temperature has dropped.
The pan is telling you something has changed.
Controlling Moisture
Good curry cooking is about balance.
A little moisture is useful.
It stops spices burning and helps release flavour from the pan.
Too much moisture prevents proper frying.
This is why many restaurant-style recipes add small amounts of water or base gravy at a time.
The chef controls the moisture instead of flooding the pan.
Practical Exercise
Try this simple test.
Take two small portions of sliced onion.
Pan One
Cook the onion slowly on low heat.
Allow moisture to build up.
Pan Two
Use medium-high heat with a little oil.
Stir regularly and allow the onion to fry.
Compare:
• Colour
• Aroma
• Texture
• Sweetness
• Flavour
This simple exercise teaches one of the most important lessons in curry cooking.
Lesson Summary
In this lesson you learned:
• Frying and steaming create very different flavours
• Heat affects flavour, colour, and texture
• Too much moisture prevents ingredients frying correctly
• Overcrowding the pan lowers temperature
• Sound and appearance tell you what is happening
• Restaurants control heat and moisture together
Learning the difference between frying and steaming is a major step towards creating deeper, richer, restaurant-style curries.
Lesson 2 Mini quiz
Quick Check: Frying vs Steaming
Before moving on, take a moment to test your understanding of the difference between frying ingredients and simply cooking them.
These quick questions will help reinforce why heat, moisture, and pan control play such an important role in creating deeper curry flavours.
Remember, two cooks can use exactly the same ingredients but get completely different results depending on what happens inside the pan.
Take your time, think it through, and don’t worry if you don’t get everything right first time.
Learning to recognise when ingredients are frying properly is one of the biggest steps towards creating rich, restaurant-style curries at home.
Lesson 2 Knowledge Review
🎉 Well done!
You’ve completed this lesson and taken another important step towards understanding what is really happening inside the pan.
You now know that cooking ingredients and developing flavour are not always the same thing.
If you passed — brilliant. You’re starting to recognise one of the biggest differences between ordinary home cooking and restaurant-style curry cooking.
If not, no problem at all — go back through the lesson and try again. Understanding the difference between frying and steaming takes practice, and every time you cook you’ll get better at spotting the signs.
Either way, you’re learning to look beyond the recipe and understand the cooking process.
🔥 Remember — a sizzling pan, controlled moisture, and proper frying are all part of building deeper curry flavour.
👉 Next up: we’ll look at why preparation and timing are so important, and how getting organised before you start cooking allows you to cook with confidence using higher heat.
Take your time, and when you’re ready — move on to the next lesson.
Lesson 3 — Preparation & Timing: The Secret Behind Fast Curry Cooking
One of the biggest surprises about restaurant-style curry cooking is how quickly everything happens.
A curry that may take a long time to prepare from scratch at home can often be cooked in a restaurant kitchen in just a few minutes.
The reason is simple.
The chef is prepared before cooking begins.
High heat cooking moves quickly, and once ingredients hit the pan there is very little time to stop, search for ingredients, chop vegetables, or measure spices.
Good preparation gives you control.
Cooking Starts Before the Pan Gets Hot
Many people think cooking begins when the heat is turned on.
In a professional kitchen, cooking starts much earlier.
Before the first ingredient enters the pan, everything is prepared and ready.
This includes:
• Vegetables chopped
• Garlic and ginger prepared
• Spices measured
• Sauces ready
• Meat prepared
• Garnishes waiting
Once the pan is hot, the focus is completely on cooking.
Understanding Mise en Place
Professional chefs use a system called mise en place.
This French cooking term simply means “everything in its place”.
The idea is simple:
Prepare everything you need before you start.
For curry cooking, this could mean having ready:
• Chopped onions
• Garlic and ginger paste
• Fresh chillies
• Mixed powder and spices
• Tomato ingredients
• Base gravy
• Pre-cooked meat or vegetables
• Fresh coriander and finishing ingredients
Everything should be within reach.
You are not just preparing ingredients.
You are preparing yourself.
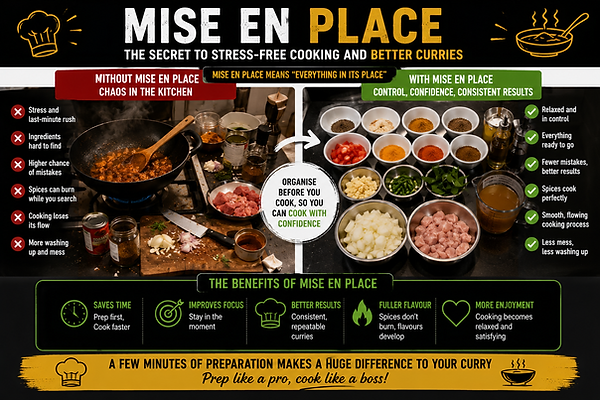
Why Preparation Matters With High Heat
High heat cooking gives amazing results, but it also reduces your reaction time.
A few seconds can make a big difference.
Garlic can go from perfectly cooked to burnt very quickly.
Spices can change from aromatic to bitter.
A sauce can reduce faster than expected.
If you have to leave the pan to find an ingredient, you lose control.
Preparation allows you to stay focused.
Restaurant Cooking Is About Flow
Watch an experienced curry chef and everything looks smooth.
Ingredients seem to go into the pan at exactly the right moment.
This is not luck.
It is organisation.
The chef knows:
• What goes in first
• What comes next
• When to increase heat
• When to slow things down
• When the curry is ready
The cooking process becomes a flow rather than a rush.
Timing Your Ingredients
Not all ingredients cook at the same speed.
Adding everything together rarely creates the best flavour.
For example:
Garlic cooks faster than onions.
Ground spices can burn faster than vegetables.
Fresh herbs are usually added near the end.
Understanding timing allows every ingredient to give its best flavour.
Avoiding Panic Cooking
Many mistakes happen because the cook feels rushed.
You might:
• Add ingredients too early
• Forget something important
• Burn spices while searching for another ingredient
• Add too much liquid because the pan feels out of control
Preparation removes this pressure.
When everything is ready, high heat cooking becomes enjoyable instead of stressful.
Preparing for BIR Style Cooking
British Indian Restaurant cooking relies heavily on preparation.
A restaurant can cook curries quickly because many components are ready before service begins.
These often include:
• Base gravy
• Pre-cooked meats
• Garlic and ginger paste
• Spice mixes
• Prepared vegetables
The final curry is about bringing these prepared elements together with the correct technique.
Practical Exercise
Before cooking your next curry, try preparing everything first.
Place all ingredients where you can see them.
Then cook without leaving the pan.
Notice:
• How much calmer cooking feels
• How much easier heat control becomes
• How quickly the curry comes together
• How much more attention you give the food
This simple habit can completely change your cooking.
Lesson Summary
In this lesson you learned:
• High heat cooking requires preparation
• Professional chefs prepare before cooking begins
• Mise en place means everything is ready and organised
• Preparation gives you better heat control
• Timing ingredients correctly improves flavour
• Restaurant speed comes from planning, not rushing
Great curry cooking is not only about what happens in the pan.
It starts before the pan is even turned on.
Lesson 3 Mini quiz
Quick Check: Preparation & Timing
Before moving on, take a moment to test your understanding of why preparation is such an important part of high heat curry cooking.
These quick questions will help reinforce how organisation, timing, and having ingredients ready gives you more control in the kitchen.
Remember, restaurant-style cooking moves quickly — good preparation allows you to focus on building flavour instead of rushing to keep up.
Take your time, think it through, and don’t worry if you don’t get everything right first time.
Learning to prepare before you cook is one of the simplest changes you can make, but it can completely transform your confidence and results.
Lesson 3 Knowledge Review
🎉 Well done!
You’ve completed this lesson and taken another important step towards cooking with more confidence and control.
You now understand that great curry cooking does not begin when the ingredients hit the pan — it starts with preparation.
If you passed — brilliant. You’re beginning to think like a chef by organising your ingredients, planning your steps, and staying in control during cooking.
If not, no problem at all — go back through the lesson and try again. Good preparation is a habit that develops over time, and every cook improves with practice.
Either way, you’re building skills that will make every curry you cook easier, calmer, and more enjoyable.
👨🍳 Remember — preparation gives you control. When everything is ready, you can focus on flavour instead of rushing.
👉 Next up: we’ll look at how to control heat like a curry chef — learning when to increase it, when to reduce it, and how to read what your pan is telling you.
Take your time, and when you’re ready — move on to the next lesson.
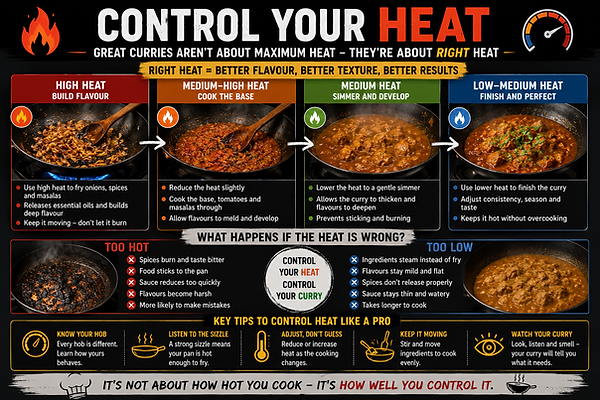
Lesson 4 — Controlling Heat Like a Curry Chef
One of the biggest skills in restaurant-style curry cooking is learning how to control heat.
Many beginners think of heat settings as fixed instructions.
Low heat.
Medium heat.
High heat.
But experienced cooks rarely think this way.
They constantly adjust.
They react to what is happening in the pan.
Great curry cooking is not about finding one perfect heat setting.
It is about learning when to increase the heat, when to reduce it, and how to keep ingredients developing without burning.
High Heat Does Not Mean Full Power
One of the biggest mistakes people make is thinking high heat means turning the hob to maximum and leaving it there.
That is not control.
That is just temperature.
Professional curry chefs may use very powerful burners, but they are constantly managing that heat.
They adjust by:
• Changing the flame level
• Moving the pan
• Stirring ingredients
• Adding small amounts of liquid
• Controlling cooking time
The skill is not creating heat.
The skill is controlling it.
The Pan Gives You Clues
Your pan is constantly telling you what is happening.
You just need to learn the signs.
Good cooks use:
• Sight
• Sound
• Smell
• Feel
These are often more reliable than simply watching a timer.
A recipe can guide you.
Your senses tell you what is actually happening.
Listening to the Pan
Sound is one of the easiest ways to understand heat.
A strong, steady sizzle usually means ingredients are frying correctly.
You can hear energy in the pan.
If the sound becomes weak or disappears, it usually means:
• The temperature has dropped
• Too much moisture has entered the pan
• Ingredients are beginning to steam
If the sizzling becomes aggressive and ingredients catch immediately, the heat may be too intense.
Learning these sounds makes cooking much easier.
Watching the Ingredients
Colour changes are another important clue.
Look for:
• Onions becoming golden
• Garlic changing slightly in colour
• Spices darkening slightly as they fry
• Sauces becoming richer and thicker
These changes show flavour development.
But there is a fine line.
Dark and roasted creates flavour.
Burnt creates bitterness.
Using Liquid to Control Heat
One of the most important techniques in BIR cooking is controlling high heat with small amounts of liquid.
This is why recipes often add small amounts of:
• Water
• Stock
• Base gravy
This does several things:
• Stops spices burning
• Reduces the pan temperature quickly
• Lifts flavour from the pan
• Allows cooking to continue at high heat
You are not cooling the curry down.
You are controlling the cooking process.
Understanding the Heat Cycle
A restaurant-style curry often moves through different heat stages.
It is not one constant temperature.
For example:
Start with strong heat to fry aromatics.
Reduce slightly when adding delicate spices.
Increase again when adding sauce.
Reduce and finish when the texture is correct.
This movement creates balance.
Controlling Spices
Spices are one of the biggest reasons beginners fear high heat.
And for good reason.
Ground spices can burn quickly.
But when controlled properly, frying spices unlocks much more flavour.
The aim is to wake the spices up.
You want them to release their oils and aromas.
You do not want them sitting dry in an overheated pan.
The Difference Between Colour and Burning
Developing colour is good.
Burning is not.
A curry sauce becoming darker and richer usually means flavour is building.
But signs you have gone too far include:
• Harsh bitter smells
• Black burnt spices
• Ingredients sticking heavily
• Smoke increasing rapidly
Good heat control keeps you close to that flavour point without crossing it.
Confidence Comes With Practice
At first, controlling heat can feel difficult.
That is normal.
Every pan, hob, and cooker behaves slightly differently.
Over time you begin to recognise:
• The correct sound
• The right smell
• The way sauce moves in the pan
• When ingredients need attention
This is when cooking becomes instinctive.
Practical Exercise
Next time you cook a curry, practice changing the heat intentionally.
Try:
• Increasing the heat during frying
• Lowering slightly when adding spices
• Increasing again to reduce the sauce
Pay attention to how the curry changes.
Listen.
Watch.
Smell.
The goal is to understand your pan.
Lesson Summary
In this lesson you learned:
• High heat cooking is about control, not maximum temperature
• Professional cooks constantly adjust heat
• The pan gives clues through sound, smell, and appearance
• Small amounts of liquid help control intense heat
• Different cooking stages need different temperatures
• Confidence develops through practice
Learning to control heat is one of the biggest steps towards cooking with the confidence of a restaurant curry chef.
lesson 4 Mini quiz
Quick Check: Controlling Heat Like a Curry Chef
Before moving on, take a moment to test your understanding of how heat control affects the way a curry develops.
These quick questions will help reinforce why great curry cooking is not about using maximum heat all the time, but learning when to increase, reduce, and adjust the heat.
Remember, experienced cooks do not just follow temperature settings — they watch, listen, smell, and respond to what is happening in the pan.
Take your time, think it through, and don’t worry if you don’t get everything right first time.
Learning to control heat is one of the biggest steps towards cooking with confidence and creating rich, restaurant-style curries at home.
Lesson 4 Knowledge Review
🎉 Well done!
You’ve completed this lesson and taken another important step towards understanding how professional curry chefs control the cooking process.
You now know that high heat cooking is not simply about turning the temperature up — it is about knowing how and when to adjust it.
If you passed — brilliant. You’re starting to understand that great curry cooking comes from watching, listening, and responding to what is happening in the pan.
If not, no problem at all — go back through the lesson and try again. Heat control is a skill that develops with practice, and every curry you cook helps improve your confidence.
Either way, you’re learning to cook with more awareness instead of just following instructions.
🔥 Remember — the pan gives you clues. The sound, aroma, colour, and texture all help tell you what your curry needs.
👉 Next up: we’ll look at one of the most important flavour-building stages in curry cooking — frying spices correctly without burning them.
You’ll learn how to unlock deeper flavours, avoid raw spice tastes, and use heat to bring your spices to life.
Take your time, and when you’re ready — move on to the next lesson.
Lesson 5 — Spice Frying Without Burning
Spices are the heart of curry cooking.
They provide the warmth, colour, aroma, and character that make every curry unique.
But adding spices is only part of the process.
To get the best flavour from them, you need to understand how to cook them correctly.
One of the biggest differences between an average curry and a great curry is how the spices are treated in the pan.
Spices Need Cooking Too
A common mistake when making curry is adding spices and then immediately adding lots of liquid.
The spices are in the curry.
But they have not had a chance to develop.
Raw spices can taste:
• Harsh
• Powdery
• Bitter
• Unbalanced
Cooking spices correctly changes their flavour.
Heat helps release the natural oils and aromas trapped inside the spices.
This creates a deeper, smoother flavour throughout the whole curry.
Why Restaurants Fry Spices
In restaurant-style curry cooking, spices are usually added directly into hot oil or a thick mixture of oil, onions, garlic, ginger, and tomato.
This allows the spices to fry.
This process helps:
• Release flavour compounds
• Remove the raw spice taste
• Create deeper colour
• Blend the spices into the sauce
The spices become part of the curry rather than simply mixed into it.
Oil and Spices
Oil plays a very important role in curry cooking.
Many spice flavours dissolve and spread better through oil than water.
This is why spices are often cooked before large amounts of liquid are added.
The oil helps carry those flavours throughout the finished dish.
This does not mean a curry needs to be oily.
It means using oil correctly during the flavour-building stages.
The Danger Zone
Spice frying is where good heat control becomes important.
Ground spices are delicate.
They need enough heat to develop.
But too much direct heat can burn them.
The difference can sometimes be only seconds.
Correctly fried spices smell:
• Warm
• Aromatic
• Rich
• Fragrant
Burnt spices smell:
• Sharp
• Harsh
• Bitter
Learning this difference is an important cooking skill.
Why BIR Cooking Uses Small Amounts of Liquid
One of the most useful techniques in British Indian Restaurant cooking is adding small amounts of liquid during the spice frying stage.
This might be:
• A splash of water
• A small amount of base gravy
• Liquid from tomatoes
This allows the chef to continue cooking at high heat while protecting the spices.
The liquid quickly evaporates.
The frying continues.
The flavour keeps building.
The Fry and Release Technique
During BIR cooking, you may notice the sauce changing.
The mixture becomes thicker.
The oil may begin separating slightly.
The colour becomes deeper.
The aroma becomes stronger.
These are signs that flavour is developing.
Many chefs repeat this process:
Fry.
Add a little liquid.
Reduce.
Fry again.
Each stage builds another layer.
Avoiding the Raw Spice Taste
If your curry tastes like individual spices rather than one complete flavour, the spices may not have cooked enough.
Common causes include:
• Adding too much liquid too soon
• Cooking on very low heat
• Not frying spices long enough
• Adding spices near the end without cooking them
Proper spice frying creates a smoother, more balanced curry.
Whole Spices vs Ground Spices
Whole spices and ground spices behave differently.
Whole spices such as:
• Cardamom
• Cinnamon
• Cloves
• Cumin seeds
Can usually handle longer frying times because their flavour releases slowly.
Ground spices expose much more surface area.
They release flavour quickly.
But they also burn more quickly.
Understanding this difference helps you control your cooking.
Do Not Chase Exact Times
Many recipes say things like:
“Cook spices for 30 seconds.”
This is only a guide.
Your pan might be hotter.
Your oil might be cooler.
Your ingredients may contain more moisture.
Instead of only watching the clock, learn to watch the spices.
The smell and appearance tell the real story.
Practical Exercise
Try this simple spice test.
Heat a small amount of oil.
Add a small pinch of curry spice mix.
Notice how the aroma changes as it warms.
Now try the same thing with a little water instead of oil.
Compare:
• Aroma
• Colour
• Flavour development
This demonstrates why frying spices correctly makes such a difference.
Lesson Summary
In this lesson you learned:
• Spices need cooking, not just adding
• Frying spices develops deeper flavour
• Oil helps distribute spice flavours
• Too little cooking can leave a raw spice taste
• Too much heat can create bitterness
• Small amounts of liquid help control spice frying
• Restaurant-style cooking builds flavour in stages
Mastering spice frying is one of the biggest steps towards creating rich, balanced, restaurant-quality curries.
lesson 5 Mini quiz
Quick Check: Spice Frying Without Burning
Before moving on, take a moment to test your understanding of how spices develop flavour during cooking.
These quick questions will help reinforce why spices need the right balance of heat, oil, timing, and control to release their full potential.
Remember, spices are not just ingredients you add to a curry — they are flavours that need to be developed.
Learning how to fry spices correctly helps create a deeper, smoother, more balanced curry while avoiding harsh or bitter flavours.
Take your time, think it through, and don’t worry if you don’t get everything right first time.
Mastering spice frying is one of the key skills that moves you closer to cooking with real restaurant-style confidence.
Lesson 5 Knowledge Review
🎉 Well done!
You’ve completed this lesson and taken another important step towards understanding how spices create flavour in curry cooking.
You now know that spices are not just ingredients to add — they need the right cooking technique to release their full potential.
If you passed — brilliant. You’re starting to understand how heat, oil, timing, and control work together to build deeper curry flavours.
If not, no problem at all — go back through the lesson and try again. Learning how spices react to heat takes practice, and recognising the right aromas and signs will become easier every time you cook.
Either way, you’re building one of the most important skills in curry cooking.
🌶️ Remember — great flavour does not just come from which spices you use, but how you cook them.
👉 Next up: we’ll look at the final stages of creating a restaurant-style curry — reduction and the finishing process.
You’ll learn how controlling moisture, thickening sauces, and finishing correctly helps create that rich colour, glossy texture, and deep flavour associated with great curry house dishes.
Take your time, and when you’re ready — move on to the next lesson.
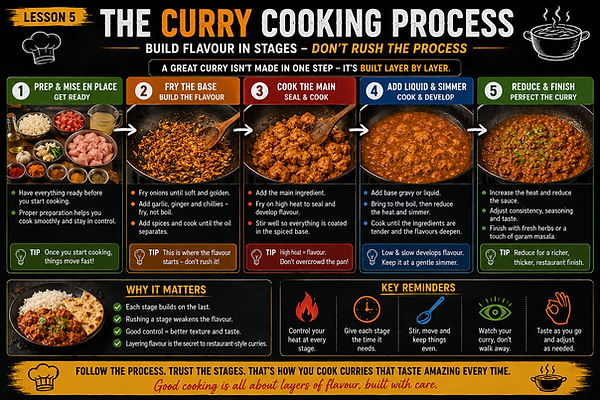
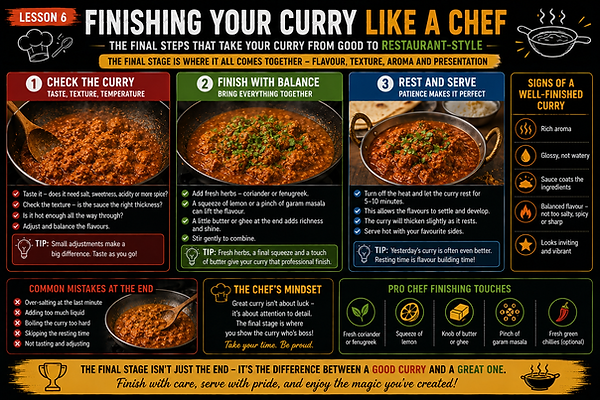
Lesson 6 — Reduction & The Restaurant Finish
One of the most noticeable differences between many homemade curries and restaurant-style curries is the final appearance and texture.
Restaurant curries often have:
• A rich colour
• A thicker sauce
• A glossy finish
• A deeper flavour
This does not happen by accident.
It is created through controlling heat, moisture, and reduction during the final stages of cooking.
A curry is not finished simply because all the ingredients are hot.
The final stage is where everything comes together.
What Is Reduction?
Reduction simply means removing excess water through cooking.
As a sauce bubbles and simmers, water evaporates.
As moisture leaves, the remaining flavours become more concentrated.
The sauce becomes:
• Thicker
• Richer
• More intense
• Better balanced
This is a key technique used in restaurant curry cooking.
Why Thin Curries Often Lack Flavour
A curry can contain all the correct ingredients and still taste weak.
The problem is often too much liquid.
Extra water spreads the flavours out.
The spices, onions, garlic, ginger, and other ingredients are there — but they are diluted.
Reducing the sauce concentrates those flavours.
It allows the curry to develop its final character.
How Restaurants Reduce Curries Quickly
British Indian Restaurant cooking is designed around fast reduction.
Restaurants often use:
• High heat
• Wide pans
• Controlled amounts of base gravy
• Constant attention
Instead of adding all the sauce at once, many chefs add base gravy in stages.
Each addition reduces.
The flavour develops.
The sauce thickens.
This controlled process creates the final texture.
The Importance of Surface Area
The shape of your pan affects reduction.
A wider pan allows more moisture to escape.
A narrow, deep pan traps more steam.
This means two curries with identical ingredients can finish differently depending on the equipment used.
This is why many restaurant chefs prefer wide pans or woks.
They allow fast evaporation and better control.
Building the Sauce in Stages
A great curry sauce is built gradually.
Think of each stage as adding another layer.
First:
The spices and aromatics create the foundation.
Next:
Small amounts of sauce are added and reduced.
Finally:
The last adjustments create the finished texture.
Rushing this process often produces a thinner, less developed curry.
Understanding Oil Separation
Many restaurant-style recipes mention cooking until the oil begins to separate.
This simply means moisture has reduced and the sauce has concentrated.
You may notice:
• Small amounts of oil appearing around the edges
• A glossy appearance
• A richer colour
This is often a sign that the sauce has reached an important stage.
It does not mean the curry should be swimming in oil.
It means the sauce has cooked properly.
The Final Burst of Heat
Many restaurant curries receive a final period of stronger heat before serving.
This helps:
• Finish reducing the sauce
• Intensify flavour
• Improve texture
• Bring everything together
This final stage requires attention.
The curry is nearly finished, but it is also when it can catch on the bottom of the pan.
Control is important.
Adjusting the Final Texture
Different curries require different finishes.
A Madras may have a looser sauce.
A Bhuna is usually much thicker.
A Korma should be smooth and creamy.
A Jalfrezi often has a reduced coating sauce.
Learning when to stop cooking is just as important as knowing when to continue.
The recipe gives guidance.
The finished curry tells you when it is ready.
Resting Before Serving
Many curries improve after resting for a few minutes.
During this time:
• The sauce settles
• Flavours combine
• The texture improves
This is why a curry can sometimes taste even better after a short rest.
Patience at the end can make a big difference.
Practical Exercise
Next time you cook a curry, observe the sauce during the final stage.
Watch how it changes.
Notice:
• How quickly liquid evaporates
• How the colour deepens
• How the texture changes
• When the sauce becomes glossy
Taste before and after reduction.
This will show you how much difference the final stage makes.
Lesson Summary
In this lesson you learned:
• Reduction concentrates curry flavour
• Too much liquid can weaken the final result
• Restaurants reduce sauces quickly using controlled heat
• Adding sauce in stages improves flavour development
• Oil separation can indicate proper cooking
• Different curries need different final textures
• The finishing stage is where everything comes together
Mastering reduction is one of the final steps towards creating rich, glossy, restaurant-style curries at home.
lesson 6 Mini quiz
Quick Check: Reduction & The Restaurant Finish
Before moving on, take a moment to test your understanding of how the final cooking stages affect the flavour, texture, and appearance of a curry.
These quick questions will help reinforce why reducing a sauce properly is such an important part of creating that rich restaurant-style finish.
Remember, a curry is not finished just because the ingredients are cooked.
The final stages are where flavours concentrate, sauces thicken, colours deepen, and everything comes together.
Take your time, think it through, and don’t worry if you don’t get everything right first time.
Learning when a curry is truly finished is one of the skills that helps turn a good curry into a great one.
Lesson 6 Knowledge Review
🎉 Well done!
You’ve completed this lesson and taken another important step towards understanding how restaurant-style curries get their final flavour, texture, and appearance.
You now know that a curry is not finished just because the ingredients are cooked — the final stages are where everything comes together.
If you passed — brilliant. You’re starting to recognise how reduction, texture, and visual clues help create a richer, more balanced curry.
If not, no problem at all — go back through the lesson and try again. Learning when a curry is properly finished takes practice, and every time you cook you’ll become better at spotting the signs.
Either way, you’re developing the skills to look beyond the recipe and understand what your curry needs.
🍛 Remember — reduction concentrates flavour. The changes in colour, aroma, and texture are all signs that your curry is developing.
👉 Next up: we’ll look at some of the most common mistakes made during high heat curry cooking — and more importantly, how to fix them.
You’ll learn how to recognise problems, adjust your cooking, and build confidence when things don’t go exactly to plan.
Take your time, and when you’re ready — move on to the next lesson.
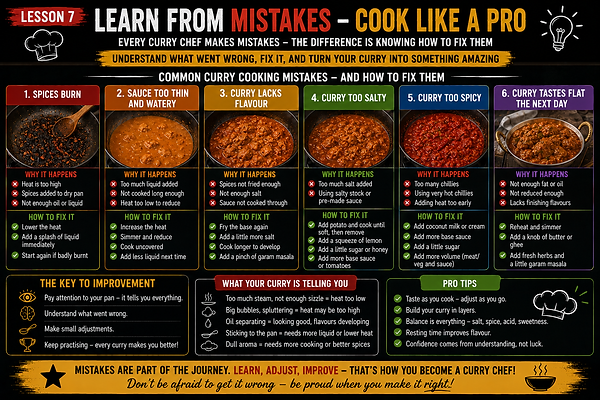
Lesson 7 — Common High Heat Cooking Mistakes & How to Fix Them
Learning to cook with higher heat is one of the biggest improvements you can make to your curry cooking.
But like any new skill, it takes practice.
Even experienced cooks occasionally get the timing wrong, add too much liquid, or push the heat slightly too far.
The important thing is learning to recognise what is happening and knowing how to adjust.
Most cooking mistakes are simply feedback from the pan.
Once you understand the signs, they become much easier to fix.
Mistake 1 — Cooking Too Gently
One of the most common mistakes in home curry cooking is being too cautious with heat.
Many people worry about burning ingredients, so they keep the temperature low throughout the whole cooking process.
The curry will cook.
But it may lack depth.
Signs this is happening:
• Pale ingredients
• Very little sizzling
• Watery sauce
• Weak aroma
• Flat flavour
How to fix it:
Allow ingredients time to fry properly.
Increase heat when needed.
Listen for that active sizzle.
Give ingredients a chance to develop colour and flavour before adding too much liquid.
Mistake 2 — Burning Garlic or Spices
This is probably the biggest fear when cooking with higher heat.
Garlic and ground spices can burn quickly if they are exposed to too much heat without control.
Signs this is happening:
• Harsh smell
• Bitter flavour
• Very dark spices
• Excessive smoke
How to fix it:
Have ingredients ready before starting.
Keep the pan moving.
Use small amounts of water or base gravy to control the temperature.
Remember:
You want to fry spices, not scorch them.
Mistake 3 — Adding Too Much Liquid Too Early
Adding lots of liquid too soon slows flavour development.
Instead of frying, ingredients start boiling.
This prevents those deep restaurant-style flavours from forming.
Signs this is happening:
• Thin sauce
• Ingredients floating rather than frying
• Little colour development
• Spices taste separate from the sauce
How to fix it:
Build sauces gradually.
Add smaller amounts.
Allow each stage to cook and reduce before adding more.
This is one of the key techniques in BIR cooking.
Mistake 4 — Overcrowding the Pan
Too much food in the pan reduces temperature quickly.
Ingredients release moisture faster than it can evaporate.
The result is steaming instead of frying.
Signs this is happening:
• Lots of liquid appears
• Sizzling disappears
• Ingredients look pale
• Cooking takes much longer
How to fix it:
Use a larger pan.
Cook smaller amounts.
Give ingredients enough space for moisture to escape.
Mistake 5 — Not Preparing Before Cooking
High heat cooking happens quickly.
Trying to chop ingredients or measure spices while cooking usually causes problems.
Signs this is happening:
• Ingredients burn while waiting
• Cooking feels stressful
• Steps get missed
• Timing feels difficult
How to fix it:
Prepare everything before heating the pan.
Have your ingredients ready and close by.
A calm cook makes better decisions.
Mistake 6 — Following Times Instead of the Food
Recipes are excellent guides.
But every kitchen is slightly different.
A gas burner, electric hob, pan size, and ingredient quantity can all change cooking times.
Signs this is happening:
• Moving on before ingredients are ready
• Cooking longer than necessary
• Ignoring what is happening in the pan
How to fix it:
Use recipes as guidance.
Also learn to watch:
• Colour
• Smell
• Texture
• Sound
The curry will show you what stage it has reached.
Mistake 7 — Stopping Too Early
Many curries are removed from the heat before they fully develop.
Everything is cooked, but the final flavour has not arrived yet.
Signs this is happening:
• Sauce tastes weak
• Texture is watery
• Flavours feel separate
• Missing that restaurant richness
How to fix it:
Allow the final reduction stage.
Let the sauce thicken.
Look for:
• Richer colour
• Stronger aroma
• Glossy texture
The final few minutes often create the biggest difference.
Learning From Mistakes
Every curry cook makes mistakes.
A slightly burnt spice mix, a thin sauce, or a rushed cooking stage is all part of learning.
The goal is not perfection every time.
The goal is understanding.
When you know why something happened, you know how to improve it next time.
This is how you move from following recipes to becoming a better cook.
Practical Exercise
Next time something does not turn out exactly right, do not just think:
“This recipe failed.”
Instead ask:
• Was my heat too low?
• Was my heat too high?
• Did I add liquid too soon?
• Did I reduce the sauce enough?
• Did I prepare properly?
Finding the reason is how your cooking improves.
Lesson Summary
In this lesson you learned:
• Most curry problems have simple causes
• Low heat can reduce flavour development
• High heat needs control
• Moisture affects frying and reduction
• Preparation prevents mistakes
• Your senses are as important as a timer
• Mistakes are part of becoming a better cook
The more you understand your pan, the less you depend on recipes.
That is when curry cooking really starts to become instinctive.
lesson 7 Mini quiz
Quick Check: Common High Heat Cooking Mistakes
Before completing this module, take a moment to test your understanding of some of the most common mistakes made when cooking with higher heat.
These quick questions will help reinforce how to recognise problems, understand why they happen, and make simple adjustments to improve your curries.
Remember, great cooks are not people who never make mistakes — they are people who learn how to recognise and correct them.
Every curry teaches you something.
Take your time, think it through, and don’t worry if you don’t get everything right first time.
Learning how to solve problems is one of the biggest steps towards becoming a more confident and instinctive curry cook.
Lesson 7 Knowledge Review
🎉 Well done!
You’ve completed this lesson and reached the end of the High Heat Cooking module.
You now understand that mistakes are not failures — they are part of learning how ingredients, heat, and technique work together.
If you passed — brilliant. You’re starting to think less like someone following instructions and more like a confident curry cook.
If not, no problem at all — go back through the lesson and try again. Learning how to recognise and fix mistakes is one of the most valuable skills you can develop in the kitchen.
Either way, you have built a much deeper understanding of how restaurant-style curry cooking works.
🔥 Throughout this module you have learned how to:
• Use heat to develop flavour
• Understand the difference between frying and steaming
• Prepare ingredients like a chef
• Control heat instead of fearing it
• Fry spices correctly
• Reduce sauces for better flavour and texture
• Recognise and fix common mistakes
Great curry cooking is not about never making mistakes.
It is about understanding what is happening and knowing how to adjust.
👉 Next up: we’ll continue building your curry skills, adding more techniques that help turn simple ingredients into amazing curries.
Take your time, keep practising, and most importantly — enjoy the cooking process.
Final Quiz: Module 4
Before you move on, take a few minutes to complete this final quiz.
These questions are designed to test your understanding of high heat curry cooking — from why heat matters and how flavours develop, to controlling your pan, frying spices correctly, and creating that final restaurant-style finish.
Take your time, think through each answer, and remember — the goal is not just to pass, but to reinforce the techniques and confidence needed to understand what is happening during cooking.
Master these skills, and you’ll move beyond simply following recipes towards cooking curries with control, consistency, and confidence.
🎉 Module 4 Complete — Mastering High Heat Cooking
Congratulations!
You’ve completed Module 4 and reached the end of the Curry Academy Foundation Modules.
Across this journey, you’ve built the essential skills behind better curry cooking — moving beyond simply following recipes and learning how great curries are created.
You now understand:
🌶️ How spices work and build flavour
🍛 How curry sauces are created
🥘 How the curry base system works
🔥 How to control heat, timing, and technique like a curry chef
Throughout this module, you’ve learned how to use heat properly, fry ingredients instead of steaming them, cook spices correctly, reduce sauces, and create that rich restaurant-style finish.
These skills are what turn curry cooking from guesswork into something you can repeat with confidence.
What Happens Next?
The journey doesn’t stop here.
Inside the Curry Academy Members Area, we start bringing everything together.
You’ll take the foundations you’ve learned and apply them to complete restaurant-style dishes, with step-by-step recipes, advanced techniques, and deeper curry knowledge.
This is where we move from understanding the building blocks…
to creating amazing curries from start to finish.
Thank you for being part of the Curry Academy journey.
Keep practising, trust the process, and most importantly — enjoy cooking great curries 👊🍛
Continue learning:
-
Next: Mastering Base Gravy
-
Related: Fundermentals of spices
-
Try it: BIR Chicken Madras Recipe